Run [ services.msc ]. On the list find “Routing and Remote Access”, double click on it and set the Startup type to “Automatic” and click OK.
Now edit the following registry path:
My Computer > HKEY_LOCAL_MACHINE > SYSTEM > CurrentControlSet > Services > Tcpip > Parameters
Now in the list you will see something like “IPEnableRouter”.
Double click on it and turn the value from 0 to 1.
Now restart your computer.
You must know the names of your adapters you are using. For the tutorial we will use “Wireless Network Connection” for the public NIC and “Local Area Connection” for the private NIC.
Now we open the command prompt and type the following command to install NAT:
netsh routing ip nat install
Now type the next command to add the public interface:
netsh routing ip nat add interface "Wireless Network Connection" full
And the last command to add the private interface:
netsh routing ip nat add interface "Local Area Connection" private
Set an IP to the private NIC of the machine that is doing routing and the clients will use that IP as their default gateway. The client’s IP addresses must be the same subnet as the gateways. Your public NIC’s IP doesn’t need to be changed!
понедельник, 31 августа 2009 г.
четверг, 27 августа 2009 г.
HFS Server. Add comments to uploaded files
To add in the upload page an additional comment besides each upload field so that you can enter a comment for each file uploaded, insert the following code to your HFS template:
%item-name%: {.!OK.} --- %item-size% ({.!Speed.} %speed% KB/s)
{.set|t|{.postvar|filecomment{.count|upload.}.}.}
{.if| %user% | {: {.set|t| by %user%. {.^t.} .} :} /if.}
{.if| {.^t.} |{: {.append| %folder-resource%\hfs.comments.txt |{.filename|%item-resource%.}={.convert|utf-8|ansi|{.^t.}.}
/append.} :}/if.}
Now you are able to add comments to files during the upload.
[special:begin]
{.comment| {.count|upload.} .}

[upload-file]
 comment

[upload-success]
{.set|t|{.postvar|filecomment{.count|upload.}.}.}
{.if| %user% | {: {.set|t| by %user%. {.^t.} .} :} /if.}
{.if| {.^t.} |{: {.append| %folder-resource%\hfs.comments.txt |{.filename|%item-resource%.}={.convert|utf-8|ansi|{.^t.}.}
/append.} :}/if.}
Now you are able to add comments to files during the upload.
Ultimate Guide To Web Optimization (Tips & Best Practices)
Ultimate Guide To Web Optimization (Tips & Best Practices): "
Web optimization is a vital part of web development and maintenance but also something often overlooked by webmasters. Just think of the money you can save, and how it can potentially help increase your readership and traffic when they are properly done.

If you have not done any optimization to your website (or blog) so far or merely curious how it can help speed up your site, please take a look at this list of optimization tips we’ve put together.
We’ve split things up into 3 separate sections for better readability – respectively server-side optimization, assets optimization (which includes web components like CSS, Javascript, images, etc) and platform, where we’ll focus on Wordpress optimization. At the last section, we throw in a couple of links we figured useful. Full list after jump.
From time to time, we monitor, benchmark and analyze the performance of our Wordpress blog. If the site is running slow, we need to know why. Here are some basic changes we’ve done and we figured will significantly increase the speed of your Wordpress blog.
Recommended Readings:
Recommended readings:
Here are more tips and tools worth checking out.
Web optimization is a vital part of web development and maintenance but also something often overlooked by webmasters. Just think of the money you can save, and how it can potentially help increase your readership and traffic when they are properly done.
If you have not done any optimization to your website (or blog) so far or merely curious how it can help speed up your site, please take a look at this list of optimization tips we’ve put together.
We’ve split things up into 3 separate sections for better readability – respectively server-side optimization, assets optimization (which includes web components like CSS, Javascript, images, etc) and platform, where we’ll focus on Wordpress optimization. At the last section, we throw in a couple of links we figured useful. Full list after jump.
Optimization: Server-side
Choose a decent Web Host
Your web hosting account has no direct relationship with the optimizations you are about to perform but we figured choosing the right web hosting account so important we decided to bring it to your attention first. Hosting account is the foundation of your website/blog where it’s security, accessibility (cPanel, FTP, SSH), server stability, prices and customer supports all play important roles. You need to make sure you are in good hands.
Recommended reading:
How to Choose a Web Host by wikiHow is a great article that gives you steps and tips you should know before purchasing any web hosting account.
Host Assets Separately
When we mention assets, we meant web components like images and static scripts that don’t require server-side processing. These includes any web graphics, images, Javascripts, Cascading Style Sheets (CSS), etc. Hosting assets separately is not a must, but we’ve seen tremendous result in terms of server stability with this implementation when the blog was having a traffic spike.
Recommended reading:
Maximizing Parallel Downloads in the Carpool Lane.
Compression with GZip
In short, contents travel from server side to client side (vicet versa) whenever a HTTP request is make. Compressing the content for sending greatly reduce the time needed to process each request.
GZip is one of the best ways to do this and it various according to the type of servers you are using. For instance, Apache 1.3 uses mod_zip, Apache 2.x uses mod_deflate and here’s how you do it in Nginx. Here are some really good articles to get you familiar with server side compressions:
- Speed up a web site by enabling Apache file compression
- Compress Web Output Using mod_gzip and Apache
- How To Optimize Your Site With GZIP Compression
- Server-side compression for ASP
Minimize Redirects
Webmasters do URL redirect (whether it’s Javascript or META redirects) all the time. Sometimes it’s purpose is to point users from an old page to new, or merely guide users to the correct page. Each redirect create an additional HTTP request and RTT (round-trip-time). The more redirection you have, the slower user will get to the destination page.
Recommended reading:
Avoid Redirects by Google Code gives you a good overview on the matter. The article also recommends some practical ways to minimize redirection to increase serving speed.
Reduce DNS Lookups
According to Yahoo! Developer Network Blog, it takes about 20-120 milliseconds for DNS (Domain Name System) to resolve IP address for a given hostname or domain name and the browser cannot do anything until the process is properly completed.
Author Steve Souders suggested that splitting these components across at least two but no more than four hostnames reduces DNS lookups and allow high degree parallel downloads. Read more on the article.
Optimization: The Assets (CSS, Javascripts, Images)
Merge Multiple Javascripts into One
Folks at rakaz.nl shares how you can combine multiple Javascripts like:
http://www.creatype.nl/javascript/prototype.js
http://www.creatype.nl/javascript/builder.js
http://www.creatype.nl/javascript/effects.js
http://www.creatype.nl/javascript/dragdrop.js
http://www.creatype.nl/javascript/slider.js
Into a single file by changing the URL to:
http://www.creatype.nl/javascript/prototype.js,builder.js,effects.js,dragdrop.js,slider.js
by manipulating the .htaccess and using PHP. Click here to read more.
Compress Javascript & CSS
Minify is a PHP5 app that can combine multiple CSS and Javascript files, compress their contents (i.e. removal of unnecessary whitespace/comments), and serve the results with HTTP encoding (gzip/deflate) and headers that allow optimal client-side caching.

Compress them online!

There are also some web services that allow you to manually compress your Javascripts and CSS files online. Here are few we come to know:
- compressor.ebiene (Javascript, CSS)
- javascriptcompressor.com (Javascript)
- jscompress.com (Javascript)
- CleanCSS (CSS)
- CSS Optimizer (CSS)
Customize Header Expiry/Caching

Credit: httpwatch
By using a customized Expiry header, your web components like images, static files, CSS, Javascript skipped unnecessary HTTP request when the same user reload the page for the second time. It reduces the bandwidth needed and definetely help in serving the page faster.
Recommended readings:
- Yahoo! Developer Network Blog – Add an Expires Header
- How To Add Good Expires Headers to Images in Apache 1.3
- HTTP Caching
- Caching Tutorial for Web Authors and Webmasters
Off-load The Assets
By off-loading, we mean separating the Javascripts, images, CSS and static files from main server where the website is hosted and place them on another server or rely on other web services. We’ve seen significant improvement here in Hongkiat by off-loading assets to other web services available, leaving the server to mainly do the PHP processing. Here are some suggestions of online services for off-loading:
- Images: Flickr, Smugmug, Paid hostings*
- Javascripts: Google Ajax Library, Google App Engine, Paid hostings*
- Web Forms: WuFoo, FormSpring
- RSS: Google Feedburner
- Survey and Polls: SurveyMonkey, PollDaddy
*Paid hostings – Paid services always have better reliability and stability. If your website is constantly requesting for the assets, you’ll need to make sure they are in good hands. We recommend Amazon S3 and Cloud Front.
Handling Web Images
Images are important part of your website. However if they are not properly optimize, they can become a burden and end up utilizing unpredictably large amount of bandwidths on daily basis. Here are some best practices to optimize your images:
- Optimize PNG Images
Folks at Smashing Magazine describes some clever techniques that may help you optimize your PNG-images. - Optimizing for Web – Things you need to know (the formats)
Learn more about Jpeg, GIF, PNG and how you should save your images for web. - Don’t Scale Images
Always practice inserting thewidthandheightfor each images. Also don’t scale down an image just because you need a smaller version on the web. For example: Do not force scale a 200×200 px image to 50×50 px for your website by altering thewidthandheight. Get a 50×50 px instead.
Optimizing with Web Services and Tools. Good news is, you don’t need to be a Photoshop expert to optimize your images. There are plenty of web services and tools to help you do the job.
- Smush.it

Probably one of the most efficient online tool to optimize images. There’s even a Wordpress plugin for it! - JPEG & PNG Stripper
A Windows tool for stripping/cleaning/removing unnecessary metadata (junk) from JPG/JPEG/JFIF & PNG files. - Online Image Optimizer
Lets you easily optimize your gifs, animated gifs, jpgs, and pngs, so they load as fast as possible on your site, by Dynamic Drive - SuperGIF
Effortlessly make all your GIF images and animations smaller. - Here’s more.
- Optimize PNG Images
Handling CSS
Modern websites uses CSS as the foundation of the style, as well as the look and feel. Not only CSS gives great flexibility to changes, it is also lesser in terms of codes needed. However, if they are badly coded, it could be a backfire. Here are some checklists, or rather guides to you make sure your CSS are properly optimized:
- Keeping Your Elements’ Kids in Line with Offspring
How to keep your markup clean with CSS Selectors. - Keep CSS short
When they give the same style, the codes are better the shorter they are. Here’s a CSS Shorthand guide you’ll probably need. - Use CSS Sprite

CSS Sprite technique reduce HTTP request each time a page is load by combining several (or all) images together on a single image file and control it’s output with CSSbackground-positionattribute. Here are some useful guides and techniques to create CSS Sprites:
- Creating easy and useful CSS Sprites
- Online CSS Sprite Generator
- Best Online And Offline CSS Sprites Generator
- Using every declaration just once
When looking to optimize your CSS files, one of the most powerful measures you can employ is to use every declaration just once. - Reduce amount of CSS files
The reason is simple, the more CSS files you have the more HTTP request it’ll have to make when a webpage is being requested. For example, instead of having multiple CSS files like the following:
<link rel="stylesheet" type="text/css" href="main.css" />
<link rel="stylesheet" type="text/css" href="body.css" />
<link rel="stylesheet" type="text/css" href="footer.css" />
You can combine them into the one single CSS:
<link rel="stylesheet" type="text/css" href="layout.css" />
Recommended readings:
- Useful Tools To Check, Clean & Optimize Your CSS File
Some of the useful tools that you can use to optimize your CSS code, even if you have completely no knowledge of CSS coding. - 7 Principles Of Clean And Optimized CSS Code
Optimization isn’t just minimizing file size – it’s also about being organized, clutter-free, and efficient. - Best Practices to optimize CSS
Consider this article more like an academic exercise rather than real-life optimization tips.
- Keeping Your Elements’ Kids in Line with Offspring
Optimization for Wordpress
From time to time, we monitor, benchmark and analyze the performance of our Wordpress blog. If the site is running slow, we need to know why. Here are some basic changes we’ve done and we figured will significantly increase the speed of your Wordpress blog.
Cache Your Worpress Blog
WP-Cache is an extremely efficient WordPress page caching system to make you site much faster and responsive. We also recommend WP Super Cache which enhances from the previous mentioned plugin and too does a great job.
Deactivate and Delete Unused Plugins
When you notice your blog is loading real slow, see if you have a lot of plugins installed. They might be the culprit.
Remove unnecessary PHP Tags
If you take a look into your theme’s source codes, you will find a lot tags like these:
<?php bloginfo('stylesheet_directory'); ?>
<?php bloginfo('description'); ?>
They can be pretty much replaced with text content that don’t cause load to the server. Check out Michael Martin’s 13 Tags to delete from your Wordpress Blog
Recommended Readings:
- 3 Easiest Ways to Speed Up WordPress
John Pozadzides shares how his blog sails smoothly through a Digg traffic spike. - 13 Great WordPress Speed Tips & Tricks for MAX Performance
Here are a few things to try if you find that your WordPress site is not performing as well as it could be due to high traffic or hidden issues you don’t know about. - 40 Wordpress Optimization Tips
Optimization tips in slides. 40 tips in 40 minutes.
Last but not least…
Here are some useful web services and tools that gives you a broader perspective and better analyzation to help you in web optimization.
Yahoo! YSlow
YSlow analyzes web pages and suggests ways to improve their performance based on a set of rules for high performance web pages. It gives you a good idea what needs to be done in order for the website to load faster.
(Firebug required)

PageSpeed
Similar to Yahoo! YSlow, Google Page Speed is an open-source Firebug add-on to evaluate the website performances and how to improve them. (Firebug required)

Pingdom Tools
Pingdom Tools take a complete load of your website including all objects (images, CSS, JavaScripts, RSS, Flash and frames/iframes) and shows you general statistics about the loaded page such as the total number of objects, total load time, and size including all objects.

Recommended readings:
Here are more tips and tools worth checking out.
вторник, 25 августа 2009 г.
Windows Vista Home Basic and Home Premium. Account password age
With Windows Vista Home Basic and Home premium an alternative command line option has to be selected in order to prevent the password from expiring.
To prevent the password from expiring in Vista Home Basic and Home premium in the Command Prompt window, execute command:
The Maximum Password Age will now be set to Zero and your password will no longer expire.
To prevent the password from expiring in Vista Home Basic and Home premium in the Command Prompt window, execute command:
net accounts /maxpwage:unlimited
The Maximum Password Age will now be set to Zero and your password will no longer expire.
понедельник, 24 августа 2009 г.
Flash. ReferenceError: Error #1056: Caused by Declaring Stage Instances Private
To avoid this error simply declare my_mc as public:
public var my_mc:MovieClip;
public var my_mc:MovieClip;
MS RDP. Because of a protocol error, this session will be disconnected. Please try connecting to the remote computer again
Problem:
i had remote desktop up and running on a PC and then i got this:
"because of a protocol error detected at the client (code 0x1104), this session will be disconnected.
please try connecting to the remote computer again"
Solution:
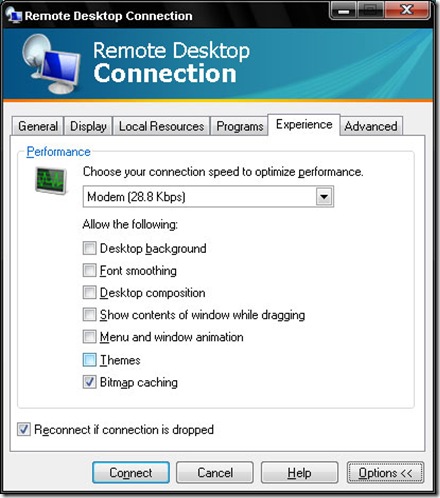
The most common reason why this is happening is because you are using a custom VISUAL STYLE with your computer. Set the visual style back to LUNA on XP or CLASSIC and see if the error occurs again. Most likely it will not. Not all visual styles produce this error, but if you want a custom visual style on the remote computer then you will have to find a compatible visual style that works with RDP via trial and error.
Another solution would be to set the RDP client to NOT use the visual styles by unchecking the box that says THEMES (see pic below):
i had remote desktop up and running on a PC and then i got this:
"because of a protocol error detected at the client (code 0x1104), this session will be disconnected.
please try connecting to the remote computer again"
Solution:
The most common reason why this is happening is because you are using a custom VISUAL STYLE with your computer. Set the visual style back to LUNA on XP or CLASSIC and see if the error occurs again. Most likely it will not. Not all visual styles produce this error, but if you want a custom visual style on the remote computer then you will have to find a compatible visual style that works with RDP via trial and error.
Another solution would be to set the RDP client to NOT use the visual styles by unchecking the box that says THEMES (see pic below):

Подписаться на:
Сообщения (Atom)