When installing SQL Server 2008 one can run into “Reboot required check failed” situation.
After seeing it few times already, I think a solution is worth mentioning.
“Why don’t you just reboot?”, you say… Well, most likely it would not help you, but try it first.
If this would not help, then try the following:
1. Start regedit.exe
2. Navigate to HKEY_LOCAL_MACHINE\SYSTEM\CurrentControlSet\Control\Session Manager
3. Locate PendingFileRenameOperations
4. Remove any data associated with the value (you may want to export the value for later review)
5. Reboot and rerun installation, check should pass.
Update. As a respond to some comments about solution above not always work you may consider the following:
* Make sure that after you reboot entry in the registry does not reappear.
If it does, remove it again, but do not reboot, just go ahead with installation process and click “ReRun”. Most likely you would be fine now.
* You may also try and see that other ControlSet001, ControlSet002, etc do not suffer from the same problem (solution mentioned by Mike Hills below).
* There was mentioning that some installations of Visual Studio 2008 could cause check to fail as well. So if nothing from above helped, uninstall Visual Studio (comes with light version of SQL Server), install SQL Server and then reinstall Visual Studio again.
Lets see why would entry reappear… This may happen if there is a driver or application which supports “recovery” mode or plain virus is around and after reboot it is trying to finish the deployment process again. In any situation try and look closer: what app file belongs to, if there are other solutions to the problem so that original process would finish properly, etc.
суббота, 7 ноября 2009 г.
среда, 4 ноября 2009 г.
How to Use RobotLegs On Top of Gaia: Part 1 of 3 – Quickstart
How to Use RobotLegs On Top of Gaia: Part 1 of 3 – Quickstart: "
RobotLegs is a MVCS framework for Flex & pure AS3 applications. You can use with Flash as well. I call it PureMVC done right. She’s still not at version 1, but is really close (docs in progress).
Why?
Requirements
 "
"
The following is a quick start guide on how to get RobotLegs working on top of the Gaia Flash Framework written by Steven Sacks. In later articles, I’ll show how to use per-Gaia-page Contexts, a visual example, as well as cover Enterprise scenarios. For now this should get you up and running in 10 minutes.
What is RobotLegs?RobotLegs is a MVCS framework for Flex & pure AS3 applications. You can use with Flash as well. I call it PureMVC done right. She’s still not at version 1, but is really close (docs in progress).
What is Gaia?
The Gaia Flash Framework is the Ruby on Rails for building Flash websites. You can code generate your entire Flash website in seconds. It has modules, SEO, page navigation, and deep-linking all built-in, amongst other things.
Why?
Gaia is great for building websites, but it’s just a platform for you to build on, a bunch of helpful scaffolding; it doesn’t prescribe a way to build your applications. Specifically, you have to write your own code for Business logic and Application/Domain logic. You still have to write code to hit back-end services, parse the returning XML/JSON/AMF, and act on that data.
This is where an application framework like RobotLegs comes in. You’re domain model goes in the Model classes, your Business logic goes in the Service classes, and your Domain/Application logic goes in your Commands & Mediators. You setup your shiz in your Context class(es), like PureMVC’s ApplicationFacade
Gaia builds your site, and RobotLegs makes it work with dynamic data.Requirements
Before we get to the “How”, you need to know 2 requirements first. This may scare some people off.
- You need both mxmlc & Flash CS4 or CS3
- Your application must be AS3
RobotLegs requires compiling in mxmlc because of the custom metadata tags. Flash CS3 & CS4 do not currently support the -keep-as3-metadata mxmlc compiler parameter, thus, you must compile your RobotLeg’s implementation code using mxmlc (via Flex Builder 2, 3, Flash Builder 4, FDT, FlashDevelop, etc.).
While you can compile Gaia to an SWC in Flash CS4, and then re-compile via a Library linkage in mxmlc, this defeats the purpose of using the Gaia workflow in Flash. I understand this is deal killer for many automated build/continuous integrations of Enterprise applications, so I’ll cover optional build scenarios in a future article.
Flash CS4 is required because it allows you to link to external libraries, in this case, Flex created SWC’s. You could utilize Flash CS3, and just add a class path to the RobotLegs classes since you’ll typically only be using the interfaces in your Flash/Gaia specific code. Both Flash CS3/CS4 will be exporting AS3 code since RobotLegs is for AS3, so you can’t use Flash 8 and export to AS2.
I currently do not have access to Flash CS5 alpha/beta to determine if it’s integration with Flash Builder 4 demoed at MAX 2009 would help in this instance, nor do I know if it can -keep-as3-metadata.
Quickstart Preface
The Quickstart may appear intimidating at 15 steps. If you know Flex Builder/FlashDevelop, Flash, Gaia, and RobotLegs, you’ll do just fine, it’s not that bad. Additionally, you only need to do this stuff once.
The rest of your project, you’ll spend in your code editor. You can also link the Main file in Flex Builder to get code hinting on it. The only time you go to Flash is to do Control + Enter.
GIT-R-DONE!!!11oneone
Quickstart
1. Setup your Gaia site.
2. Open up your main.fla in Flash.
3. In Flash CS4, go to File > Publish Settings, click the Flash tab, click the Settings button next to AS version, click the Library Path tab, and link to the RobotLegs.swc. In Flash CS3, just add a class path to the RobotLegs source code directory.

4. Save your main.fla.
5. Create an ActionScript 3 project in Flex/Flash Builder, FDT, or FlashDevelop. Point it to the same directory your Gaia project lives. I suggest changing bin-debug to bin since that’s what Gaia uses. Although it’ll generate a SWF, it’s hereafter referred to as a “module” SWF since Gaia will load it in and use it’s pre-compiled classes.
6. Create your own main class, differently named (ie not “Main.as”), and put next to Gaia’s Main.as. This will be where your RobotLegs code lives.

7. Link to the RobotLegs.swc as a Library. If you are in Flex/Flash Builder, you may wish to link to the RobotLegsLib Library project instead. If so, I put this in Gaia’s lib folder next to the FLA’s that Gaia puts there. The image below shows linking to the Library Project.

8. Create a “MainContext” ActionScript class where ever you’d like in your package structure. Might I recommend something other than Gaia’s pages directory, like “com.company.project.robotlegs.contexts”. In this class, you register your modules, in this case, your Gaia pages that actually need Mediators. Here’s mine:
package com.jxl.gaiarobotlegs.robotlegs.contexts
{
       import com.jxl.gaiarobotlegs.pages.IAboutPage;
       import com.jxl.gaiarobotlegs.robotlegs.mediators.AboutMediator;

       import flash.display.DisplayObjectContainer;

       import org.robotlegs.mvcs.Context;

       public class MainContext extends Context
       {
               public function MainContext(contextView:DisplayObjectContainer)
               {
                       super(contextView);
               }

               public override function startup():void
               {
                       mediatorMap.mapModule('com.jxl.gaiarobotlegs.pages::AboutPage', IAboutPage, AboutMediator);
                       super.startup();
               }
       }
}
Notice the mapModule method goes “Your Gaia Page class as a String”, “The interface the Gaia Page class and the Mediator share”, and “The RobotLegs Mediator class”. NOTE: In older builds of RobotLegs, they are using the fully qualified class name which is ::AboutPage, not .AboutPage (more info). I have a hacked version locally which accepts a normal package path of “pages.AboutPage” vs. “pages::AboutPage”. Yes, I’ve asked the RobotLegs authors to fix this.
9. Create 1 more class and 1 corresponding interface: a Mediator class for whatever Gaia page you’ll be mediating, and an interface of the same name with the I prefix. Example: If you’re creating an “About Us” page for your site, you’ll probably have an about page node in your site.xml, and thus a corresponding FLA. Create an “IAboutUs” interface, and an “AboutUsMediator” class that implements the interface. Your Gaia “AboutUsPage” class will also implement the “IAboutUs” interface. This is how RobotLegs will communicate to your Gaia code via the Bridge Pattern (more info on why).
Here’s the interface:
package com.jxl.gaiarobotlegs.pages
{
       public interface IAboutPage
       {
               function setAboutText(value:String):void;
       }
}
Here’s the Mediator:
package com.jxl.gaiarobotlegs.robotlegs.mediators
{
       import com.jxl.gaiarobotlegs.pages.IAboutPage;

       import flash.events.TimerEvent;
       import flash.utils.Timer;

       import org.robotlegs.mvcs.Mediator;

       public class AboutMediator extends Mediator
       {
               [Inject]
               public var aboutPage:IAboutPage;

               private var timer:Timer;

               public function AboutMediator()
               {
                       super();
               }

               public override function onRegister():void
               {
                       timer = new Timer(3 * 1000);
                       timer.addEventListener(TimerEvent.TIMER, onTick, false, 0, true);
                       timer.start();
               }

               private function onTick(event:TimerEvent):void
               {
                       timer.stop();
                       timer.removeEventListener(TimerEvent.TIMER, onTick);
                       timer = null;

                       aboutPage.setAboutText('Blah blah blah,nthis is from RobotLeg's 'AboutMediator'');
               }
       }
}
Thing to note in the above is the Dependency Injection via the [Inject] tag does IAboutPage vs. AboutPage; this ensures mxmlc doesn’t attempt to compile Gaia code into your module SWF.
10. Any events your Gaia About Us page will emit, put in the IAboutUs interface. Any data your Gaia About Us page needs to have set on itself, implement a setter or a method in the IAboutUs interface. This’ll ensure your About Us page class in Gaia and your AboutUsMediator won’t compile until you implement those methods, nor will your AboutUsMediator RobotLegs class. Yes, I know events in interfaces aren’t enforced, but that doesn’t mean you shouldn’t do it.
Here’s the Gaia AboutPage class:
package com.jxl.gaiarobotlegs.pages
{
       import com.gaiaframework.api.*;
       import com.gaiaframework.debug.*;
       import com.gaiaframework.events.*;
       import com.gaiaframework.templates.AbstractPage;

       import flash.display.*;
       import flash.events.*;
       import flash.text.TextField;

       import gs.*;

       public class AboutPage extends AbstractPage implements IAboutPage
       {
               public var copyTextField:TextField;

               public function AboutPage()
               {
                       super();
                       alpha = 0;
                       //new Scaffold(this);
                }

               // called by RobotLegs's AboutPageMediator
                public function setAboutText(value:String):void
               {
                       copyTextField.text = value;
               }

               override public function transitionIn():void
               {
                       super.transitionIn();
                       TweenLite.to(this, 0.3, {alpha:1, onComplete:transitionInComplete});
               }

               override public function transitionOut():void
               {
                       super.transitionOut();
                       TweenLite.to(this, 0.3, {alpha:0, onComplete:transitionOutComplete});
               }
       }
}
Notice the implementation of IAboutPage. Since Gaia FLA’s by default have “../src” set in their class path, it’ll share the same class path with your ActionScript project. The only class it’s importing form that code, however, is the interface, which is a few 300 bytes or so once compiled into the SWF. If you’re clever, you could use External Libraries in CS4, but that’s out of scope for this article.
11. Open up your main.as file in your editor of choice. First, create a mainContext class reference, like:
private var mainContext:IContext;
12. Override init and do no call super.init. Instead, write code to load in your RobotLegs SWF that your ActionScript project will create in bin. You can use a Loader, your own wrapper class, extend Main to abstract away these details in a base class… whatever you want. I used a Loader for this example. Ensure you load the classes into the same ApplicationDomain so Gaia can share and use these classes, as well as any loaded SWF’s that need them.
var loaderContext:LoaderContext = new LoaderContext(false, ApplicationDomain.currentDomain);
moduleLoader.load(new URLRequest('GaiaRobotLegs.swf'), loaderContext);
13. In your Event.COMPLETE function, snatch your MainContext class from the loaded SWF, instantiate it, and pass the stage in, and call super.init to let Gaia know you’re done, like so:
private function onComplete(event:Event):void
{
       const mainContextClassName:String = 'com.jxl.gaiarobotlegs.robotlegs.contexts.MainContext';
       try
       {
               var mainContextClass:Class = moduleLoader.contentLoaderInfo.applicationDomain.getDefinition(mainContextClassName) as Class;
               mainContext = new mainContextClass(stage) as IContext;
       }
       catch(err:Error)
       {
               trace('Failed to find class: ' + err);
       }
       super.init();
}
You use the stage so any DisplayObject added to the DisplayList will be checked to see if it has an associated Mediator. Yes, I know OOP Purists will groan at this; don’t worry, I’ll offer a more pure solution later. Remember, Gaia is typically used in Agencies with 2 week deadlines vs. 4 months; this is more than good enough for that crowd.
14. In your main ActionScript project class, define a dependency variable; this is strictly to ensure your RobotLegs code is compiled into the “module SWF”. Assuming you have Build Automatically on in Flex Builder, it should make your SWF in the bin folder for you once you save. Here’s mine:
package
{

       import com.jxl.gaiarobotlegs.robotlegs.contexts.MainContext;

       import flash.display.Sprite;

       public class GaiaRobotLegs extends Sprite
       {
               private var mainContext:MainContext;

               public function GaiaRobotLegs()
               {
                       super();
               }
       }
}
15. Test your Gaia project in Flash.
Conclusions
As you can see, all you need to do now is code all your code in Flex Builder (or editor of choice), and anytime you need to compile your site, you just go back to main.fla in Flash and hit Control + Enter.
You’ll also notice I create one “global” context here. Reiterating, this is good enough for most design agencies as not every Gaia page will need a Mediator, and most Gaia pages aren’t that complex View’s anyway.
For the purists, in a future article I’ll explain how you can modify the Gaia template files, and configure your Context classes via the Gaia site.xml externally. This ensures that the details of a Gaia page registering it’s own Context, or simply just creating a single Context + Mediator for itself, are self-contained and as strongly-typed as possible.
For those building Enterprise sized sites with automated build processes, I’ll later go into how you can integrate a Gaia site into your build process.
Thanks
Just a quick thanks to Steven for helping answer my Gaia architecture questions, and to the RobotLegs crew for helping me work out the details of how it could be done.
понедельник, 2 ноября 2009 г.
VMWare. Resize and shrink virtual disks
In order to resize and/or shrink virtual disk you have to:
1. before doing a shrink, run a really cool command line tool developed by Mark Russinovich, SDelete. Simply, execute SDelete with parameter -c inside running Virtual machine ;
2. switch off this guest virtual machine;
3. write down the settings of all the virtual disks connected to the machine;
4. Check if you have virtual disk with preallocated space. Change its type ,running the following command:
vmware-vdiskmanager.exe -r DiskC-flat.vmdk -t 0 DiskC.vmdk
5. Run Shrink command:
vmware-vdiskmanager.exe -k DiskC.vmdk
среда, 21 октября 2009 г.
Ms Vista and 1c v7.7 codepage
Для решения проблемы работы в файловом варианте необходимо использовать 1С релиза 26 или 27 (но лучше 27). Фирма 1С реализовала механизм отключения проверки кодовой странции с помощью проверки на существование файла OrdNoChk.prm. Соответственно, этот файл должен быть или в каталоге базы данных или же в каталоге программных файлов 1С (BIN). Файл OrdNoChk.prm в каталоге BIN будет действовать на все базы, с которыми работает программа 1С запущенная с этого каталога. Следовательно, для отключения проверки кодировки для всех баз - разместите файл в каталоге BIN программных файлов, а для отключения проверки кодировки выборочно для базы (баз) создайте файл OrdNoChk.prm в каталоге базы.
В некторый случаях, дополнительно надо еще установить кодовую страницу для базы на "+Текущая системная установка". Это делается в режиме Конфигуратора:
"Меню - Администрирование - Кодовая страница таблиц ИБ... - "+Текущая системная установка"".
Надо быть осторожным при изменении кодовой страницы, если с базой работают по сети и у клиентов установлены разные версии ОС.
2. Для работы 1С с базами в формате MS SQL под MS Vista можно использовать как MS SQL 2000 так и MS SQL 2005. Хотя при установке SQL 2000 и выдается сообщение о необходимости установки более новой версии SQL Server, но установка и дальнейшая работа MS SQL Server 2000 проходит без особых проблем (пока не удалось заметить каких либо глюков). Надо только обратить внимание, что при установке SQL Server кодировка на уровне сервера может быть установлена отличная от Cyrillic_General_CI_AS, поэтому, желательно самому вручную поставить необходимую установку Collation в Cyrillic_General_CI_AS (кириллица регистронезависимая по возрастанию).
среда, 30 сентября 2009 г.
Avira Antivir Personal update issue
In case Avira can't update in automatic mode, try to start the updater manually via command-line:
cmd>"C:\Program Files\Avira\AntiVir Desktop\update.exe" /DM="0" /NOMESSAGEBOX /receivetimeout=120
or cmd>"C:\Program Files (x86)\Avira\AntiVir Desktop\update.exe" /DM="0" /NOMESSAGEBOX /receivetimeout=120
понедельник, 28 сентября 2009 г.
Учись Работать / Пробежки: хороший спорт для айтишника или как начать бегать
Всем известно что IT специалисты, в большистве своём, ведут сидячий образ жизни. Практически все рабочее время они проводят на своей 5-й точке. Это явно не идёт на пользу здоровью. А если учесть тот факт, что рацион среднестатистического ITшника достаточно вреден для организма, то в результате всех ждут: избыточный вес, атрофирование мышц, и еще всякие «мелкие неприятности» (вроде геморроя и импотенции). В этой статье я раскажу о пользе регулярных физических нагрузок, о беге трусцой, чем он хорош, и главное — как начать им заниматься.
Регулярные физические нагрузки нужны и полезны. Среднестатистический ITшник недополучает физических нагрузок на работе, это факт. Он не таскает холодильники на 9й этаж без лифта, не носит мешки с цементом на стройке, не бегает за мамонтом в надежде на вкусный ужин. Так что со временем он только «хиляет» и «сдувается». Думаю, это ощущает каждый, кто еще не занимается спортом по какой-либо причине, будь то нехватка времени, лень, или растеряность. Если же желание всё же возникает, то вместе с ним возникает и вопрос — какой же спорт выбрать?
П.С. Регулярный бег позволяет эффективно сбросить вес.
Чем хорош бег? Многие айтишники — одиночки. Они глубокомысленны, вдумчивы, и ни разу не склонны и чрезмерному общению. В общем, «сами в себе», эдакие затворники. Отлично! Бег отлично подойдет им по духу! В процессе бега можно отвлечься от насущных проблем, помечтать, послушать любимую музыку, обдумать какието планы, или же просто отключить мозг. Не надо думать «сколько подходов сделать и с каким весом», делать серьезное лицо или пытаться выглядеть «круто».
На заметку:
— Бегом можно заниматься в любое удобное время: утром, вечером или днем.
— Для него не нужна определенная «секция», фитнесс-клуб, или спортзал.
— Бегать можно и в одиночестве, и с кем-нибудь, на результат это не повлияет.
Подробнее о беге. Бег трусцой — не быстрый бег со скоростью 7-9 километров в час. Это не спринт, в процессе вы не будете очень сильно уставать и думать «блин зачем я это начал», весь процесс будет приятен и ненавязчив. Вместе с тем, это отличный способ держать себя в тонусе (при беге работают почти все мышцы человеческого тела). Также бег помогает освежить мозг и отвлечься.
В далекие 80-е бег был крайне популярен. Однако, со временем выявились и его недостатки. Он не безвреден. Бегая по твердой поверхности (если не соблюдать технику) бегун с каждым шагом получает микровстряску для всех внутренних органов, что может быть очень опасно, и даже смертельно. Выяснилось это в те времена, когда один из бегунов умер прямо при беге (к слову, акция проходила под лозунгом «Бегом от инфаркта»). С тех пор этот лозунг свернули, и стали проповедовать правильный подход к этому виду спорта. Но об этом чуть позже.
Выберите время, когда вам удобнее бегать. Я, например, не люблю бегать по утрам. Предпочитаю вечерние пробежки, где-то в пол-десятого вечера, когда уже стемнело. Преимущества? Ночной город выглядит совершенно по другому, красивее. Меньше прохожих. А так же отличный способ освежить разум, чтобы после пробежки снова заняться какими-нибудь делами. После вечерней пробежки и холодного душа — вы снова полны сил! Можно выйти на пробежку и в полночь. Я так делал регулярно, когда не надо было утром рано вставать.
Также вам понадобится минимальная экипировка. Кросовки, футболка, шорты. Опционально, повязка на голову чтоб придержать волосы. Все это лучше купить в обычном магазине спорттоваров. Особое внимание уделите кросовкам — это должны быть не имиджевые модели, а беговые. Хорошая толстая подошва, хорошо пружинящая в районе пятки. Не обращайте внимания на дизайн и производителя.
Футболку и шорты можно взять обычные, но лучше если из термоматериалов, отводящих пот. Обязательно убедитесь, что все на вас хорошо сидит, даже если в жизни вы предпочитаете широкую одежду. Во время бега она просто будет на вас болтаться и мешать. Опять таки не обращайте внимание на дизайн, это вам нужно для спорта, а не для каких-либо понтов.
Проложите маршрут. Возьмите карту, бумжаную или yandex maps, и используя линейку по выбранному маршруту считайте дистанцию. Если вы новичок — начните с 3х километров (учитывайте путь туда и обратно), средняя дистанция для сферического бегуна в вакууме — 6-8 километров. Прокладывая маршрут, избегайте холмов, и препятствий — это часть подготовки к марафонским дистанциям, так что если не планируете марафонить (10 — 20 километров и выше) — это вам ни к чему. Избегайте бегать «вокруг чего-то», например, вокруг стадиона, вам это быстро надоест. Куда приятнее бегать по городу. Раньше вы просто не обращали внимание, но вы будете поражены тем, сколько других людей бегают вместе с вами. Причем независимо от времени (конечно, если это не глубокая ночь).
Приготовьте плеер, плейлист, если планируете слушать музыку в процессе. Независимо от предпочтений, рекомендую спокойную музыку. Так же рекомендую включать shuffle (random).
Позаботьтесь о наушниках. Они должны плотно сидеть на голове и не слетать. Закрытые наушники и с мягкой тряпичной амбразурой лучше не использовать, они будут собирать пот. Хорошо подойдут обычные «затычки».
Не ешьте перед бегом минимум 2 часа. Если бежите утром — не завтракайте, если вечером — не ужинайте. Так же не пейте воду, даже если хочется.
Хорошенько зашнуруйте кросовки. Крепко. необходимо чтоб они стали продолжением ваших ног. Т.к. бег очень сильно изнашивает опорно-двигательный аппарат, обувь — самое важное в беге.
Сделайте разминку. Как в школе на уроках физкультуры. Разминайте все, вплоть до шеи. Бег заставляет работать почти все мышцы человеческого тела, так что не удивляйтесь, если на следующий день у вас будут ныть плечи.
Смотрите себе под ноги. С непривычки очень легко споткнуться о кочку и упасть. Особенно, если вы бежите в темное время суток. Через некоторое время вы привыкните автоматически замечать препятствия (возможные причины падения), и сможете рассматривать окрестности.
Помните, что бежать надо очень плавно, мягкими небольшими шажками, ступая на пятки. Некоторым это может показаться странным, но на самом деле просто подумайте — когда вы бежите «на скорость», спринт например, вы ступаете на носочки, которые должны быть упругими — ведь вы ими отталкиваетесь. А тут мы с вами преследуем другие цели — максимально безопасно «нагрузить» наш организм, скорость и дистанция не важны.
Также, контролируйте дыхание — если вы начали задыхаться, значит вы бежите слишком быстро. Идеальный бег трусцой — когда вы можете бежать и общаться с вашим спутником одновременно. Конечно, это потребует некоторой практики…
Так же, контролируйте руки. Некоторые новички в процессе бега начинают очень сильно им размахивать (как будто это помогает им бежать), на самом деле это лишь отнимает силы. Лучше всего, прижмите согнутые локти к туловищу, а кисти (сожмите в них ключи/плеер/whatever) перед собой.
Самое главное. Получайте удовольствие. Думайте о смысле жизни, законах мироздания, сути бытия. Слушайте любимую музыку, рассматривайте окрестности (надеюсь, они у вас красивые).
Средний бег должен продолжаться 40 минут и выше. Если вы новичок, то на 10-15 минут меньше (считается что жир начинает сгорать спустя 40 минут после начала нагрузок).
Очень эффективно сразу после бега качать пресс. Ведь мышцы живота только что получили неплохую подготовительную нагрузку.
По желанию еще можно сделать приседания или отжимания. Потом — сразу в душ. Маленький лайфхак: спортивную одежду возьмите с собой в душ, и пока будете мыться сами хорошенько прополощите. Она ведь не грязная, основательная стирка не требуется, просто надо смыть пропитавший ее пот (пока он свежий и это легко). Затем повесьте сушится. На следующую пробежку вас будет ждать относительно свежая форма (как минимум, не дурно пахнущая).
Душ, кстати, пока тело горячее, лучше принимать прохладный. Это намного приятнее и полезнее чем очень горячий душ (что аж пар идет).
Воду пить как не в себя сразу тоже не следует, лучше немного выждать.
Кстати после пробежки у вас не будет желания наесться от пуза. Отличный способ регулировать рацион. Но это уже тема отдельной статьи, посвященной здоровому питанию.
Вот и все. Очень скоро после начала ваших пробежек трусцой вы втянетесь и начнете получать удовольствие от каждой пробежки. Это очень просто — надо только начать.
Особо подчеркну, что олично бегать можно вплоть до температуры -10 градусов по Цельсию (даже если вы не «морж»). Если тема интересна — могу написать об особенностях бега зимой отдельно."
Регулярные физические нагрузки нужны и полезны. Среднестатистический ITшник недополучает физических нагрузок на работе, это факт. Он не таскает холодильники на 9й этаж без лифта, не носит мешки с цементом на стройке, не бегает за мамонтом в надежде на вкусный ужин. Так что со временем он только «хиляет» и «сдувается». Думаю, это ощущает каждый, кто еще не занимается спортом по какой-либо причине, будь то нехватка времени, лень, или растеряность. Если же желание всё же возникает, то вместе с ним возникает и вопрос — какой же спорт выбрать?
П.С. Регулярный бег позволяет эффективно сбросить вес.
Чем хорош бег? Многие айтишники — одиночки. Они глубокомысленны, вдумчивы, и ни разу не склонны и чрезмерному общению. В общем, «сами в себе», эдакие затворники. Отлично! Бег отлично подойдет им по духу! В процессе бега можно отвлечься от насущных проблем, помечтать, послушать любимую музыку, обдумать какието планы, или же просто отключить мозг. Не надо думать «сколько подходов сделать и с каким весом», делать серьезное лицо или пытаться выглядеть «круто».
На заметку:
— Бегом можно заниматься в любое удобное время: утром, вечером или днем.
— Для него не нужна определенная «секция», фитнесс-клуб, или спортзал.
— Бегать можно и в одиночестве, и с кем-нибудь, на результат это не повлияет.
Подробнее о беге. Бег трусцой — не быстрый бег со скоростью 7-9 километров в час. Это не спринт, в процессе вы не будете очень сильно уставать и думать «блин зачем я это начал», весь процесс будет приятен и ненавязчив. Вместе с тем, это отличный способ держать себя в тонусе (при беге работают почти все мышцы человеческого тела). Также бег помогает освежить мозг и отвлечься.
В далекие 80-е бег был крайне популярен. Однако, со временем выявились и его недостатки. Он не безвреден. Бегая по твердой поверхности (если не соблюдать технику) бегун с каждым шагом получает микровстряску для всех внутренних органов, что может быть очень опасно, и даже смертельно. Выяснилось это в те времена, когда один из бегунов умер прямо при беге (к слову, акция проходила под лозунгом «Бегом от инфаркта»). С тех пор этот лозунг свернули, и стали проповедовать правильный подход к этому виду спорта. Но об этом чуть позже.
Подготовка к бегу
Выберите время, когда вам удобнее бегать. Я, например, не люблю бегать по утрам. Предпочитаю вечерние пробежки, где-то в пол-десятого вечера, когда уже стемнело. Преимущества? Ночной город выглядит совершенно по другому, красивее. Меньше прохожих. А так же отличный способ освежить разум, чтобы после пробежки снова заняться какими-нибудь делами. После вечерней пробежки и холодного душа — вы снова полны сил! Можно выйти на пробежку и в полночь. Я так делал регулярно, когда не надо было утром рано вставать.
Также вам понадобится минимальная экипировка. Кросовки, футболка, шорты. Опционально, повязка на голову чтоб придержать волосы. Все это лучше купить в обычном магазине спорттоваров. Особое внимание уделите кросовкам — это должны быть не имиджевые модели, а беговые. Хорошая толстая подошва, хорошо пружинящая в районе пятки. Не обращайте внимания на дизайн и производителя.
Футболку и шорты можно взять обычные, но лучше если из термоматериалов, отводящих пот. Обязательно убедитесь, что все на вас хорошо сидит, даже если в жизни вы предпочитаете широкую одежду. Во время бега она просто будет на вас болтаться и мешать. Опять таки не обращайте внимание на дизайн, это вам нужно для спорта, а не для каких-либо понтов.
Проложите маршрут. Возьмите карту, бумжаную или yandex maps, и используя линейку по выбранному маршруту считайте дистанцию. Если вы новичок — начните с 3х километров (учитывайте путь туда и обратно), средняя дистанция для сферического бегуна в вакууме — 6-8 километров. Прокладывая маршрут, избегайте холмов, и препятствий — это часть подготовки к марафонским дистанциям, так что если не планируете марафонить (10 — 20 километров и выше) — это вам ни к чему. Избегайте бегать «вокруг чего-то», например, вокруг стадиона, вам это быстро надоест. Куда приятнее бегать по городу. Раньше вы просто не обращали внимание, но вы будете поражены тем, сколько других людей бегают вместе с вами. Причем независимо от времени (конечно, если это не глубокая ночь).
Приготовьте плеер, плейлист, если планируете слушать музыку в процессе. Независимо от предпочтений, рекомендую спокойную музыку. Так же рекомендую включать shuffle (random).
Позаботьтесь о наушниках. Они должны плотно сидеть на голове и не слетать. Закрытые наушники и с мягкой тряпичной амбразурой лучше не использовать, они будут собирать пот. Хорошо подойдут обычные «затычки».
Непосредственно перед бегом
Не ешьте перед бегом минимум 2 часа. Если бежите утром — не завтракайте, если вечером — не ужинайте. Так же не пейте воду, даже если хочется.
Хорошенько зашнуруйте кросовки. Крепко. необходимо чтоб они стали продолжением ваших ног. Т.к. бег очень сильно изнашивает опорно-двигательный аппарат, обувь — самое важное в беге.
Сделайте разминку. Как в школе на уроках физкультуры. Разминайте все, вплоть до шеи. Бег заставляет работать почти все мышцы человеческого тела, так что не удивляйтесь, если на следующий день у вас будут ныть плечи.
В процессе бега
Смотрите себе под ноги. С непривычки очень легко споткнуться о кочку и упасть. Особенно, если вы бежите в темное время суток. Через некоторое время вы привыкните автоматически замечать препятствия (возможные причины падения), и сможете рассматривать окрестности.
Помните, что бежать надо очень плавно, мягкими небольшими шажками, ступая на пятки. Некоторым это может показаться странным, но на самом деле просто подумайте — когда вы бежите «на скорость», спринт например, вы ступаете на носочки, которые должны быть упругими — ведь вы ими отталкиваетесь. А тут мы с вами преследуем другие цели — максимально безопасно «нагрузить» наш организм, скорость и дистанция не важны.
Также, контролируйте дыхание — если вы начали задыхаться, значит вы бежите слишком быстро. Идеальный бег трусцой — когда вы можете бежать и общаться с вашим спутником одновременно. Конечно, это потребует некоторой практики…
Так же, контролируйте руки. Некоторые новички в процессе бега начинают очень сильно им размахивать (как будто это помогает им бежать), на самом деле это лишь отнимает силы. Лучше всего, прижмите согнутые локти к туловищу, а кисти (сожмите в них ключи/плеер/whatever) перед собой.
Самое главное. Получайте удовольствие. Думайте о смысле жизни, законах мироздания, сути бытия. Слушайте любимую музыку, рассматривайте окрестности (надеюсь, они у вас красивые).
Средний бег должен продолжаться 40 минут и выше. Если вы новичок, то на 10-15 минут меньше (считается что жир начинает сгорать спустя 40 минут после начала нагрузок).
После
Очень эффективно сразу после бега качать пресс. Ведь мышцы живота только что получили неплохую подготовительную нагрузку.
По желанию еще можно сделать приседания или отжимания. Потом — сразу в душ. Маленький лайфхак: спортивную одежду возьмите с собой в душ, и пока будете мыться сами хорошенько прополощите. Она ведь не грязная, основательная стирка не требуется, просто надо смыть пропитавший ее пот (пока он свежий и это легко). Затем повесьте сушится. На следующую пробежку вас будет ждать относительно свежая форма (как минимум, не дурно пахнущая).
Душ, кстати, пока тело горячее, лучше принимать прохладный. Это намного приятнее и полезнее чем очень горячий душ (что аж пар идет).
Воду пить как не в себя сразу тоже не следует, лучше немного выждать.
Кстати после пробежки у вас не будет желания наесться от пуза. Отличный способ регулировать рацион. Но это уже тема отдельной статьи, посвященной здоровому питанию.
Вот и все. Очень скоро после начала ваших пробежек трусцой вы втянетесь и начнете получать удовольствие от каждой пробежки. Это очень просто — надо только начать.
Особо подчеркну, что олично бегать можно вплоть до температуры -10 градусов по Цельсию (даже если вы не «морж»). Если тема интересна — могу написать об особенностях бега зимой отдельно."
четверг, 24 сентября 2009 г.
20+ Car Pimping and Tuning Photoshop Tutorials
20+ Car Pimping and Tuning Photoshop Tutorials: "


 "
"
We’ve seen how Photoshop has been extensively used in areas like web designing and beauty photo retouching. In today’s post, we bring you into another stretch where Photoshop also rules and dominates – the modding and sketching of rides.

This following article is dedicated to car lovers, forumites who use car photos as signatures, web designers or anyone who fascinates nice rides. We search the Internet and here we put forward some of the best Photoshop tutorials with techniques on how to mod a car. Full list after jump.
Colors Manipulation
Chrome your car
Gives your car body that chrome effect. Works better with black default.

Color Tweak The Ferrari
This tutorial make use of an additional mask and give your car a color change on the fly by applying different color blending options.

How to make Car Advertisement Mock-ups
Get your car air brushed with any color, or design. But before that, Thomas Baekdal suggest you give it the right base color.

Add Flaming Decals to a Modern Car Design
This tutorial will explain the steps needed to turn this boring Prius into an awesome street racer.

Body and Parts Enhancements
Porsche digital rendering photoshop tutorial
How to render a low quality digital car photo into a high quality output.

Give your car a little wood
Here is one way to take a simple texture and apply it to a shaped object like a car and have it appear to follow the body contours.


Create a real life "Cars"
How to create a real CARS of your own cars.


Vanity License Plate
How to create a custom vanity license plate using a few basic Photoshop tools a piece of reference material and some creative layer stylings.

Car Enhancement with Digimods
Folks at Digimods have a comprehensive list of Photoshop tutorials covers almost everything you will want to mod on a ride. From adding a bad boy bonnet, carbon fibre bonet to lowering the car, changing the wheels and much more!

Freehand and Sketching
Concept car sketch Photoshop Tutorial
This tutorial describes how to render this car with paths, and finishes the paints with later masks and filters.

Drawing a Car Lineart in Photoshop
Draw the lineart of this Mclaren F1 using paths. You are required to have some experience in using Photoshop’s Pen tool to be able to draw this car in detail.

Photoshop Rendering
Photoshop rendering in Photoshop by Emre Husmen, a 20 year old Turkish design student, also the 2004 Peugeot Design Contest finalist.

Rapid Development Sketching
"In this tutorial it is assumed that you already have a design theme worked out and know roughly what your car will look like. Ideally you would be working over a photo of a clay or screenshot of an alias model. I have chosen a supercar to show the methods used here because the forms are exaggerated and it is easier to see how they are being rendered." Miles Waterhouse

Vector Car Tutorial
This tutorial guides you through creating a vector toon based Veilside’s Fortune RX7 from scratch.

Dramatic Effects
Create a truck coming from a flame
Create a Acura commercials simmilar effect where a truck came out from the flame.

Super Slick Lighting Effects
Learn how to combine photos and brush strokes to give a car photo slick dusky lighting effects.

How To Create An Amazing Car Illustration
How to create a fierce car illustraton making use of different type of brushes.

Create a Smoky Car Crashing Shot
"We have another tutorial this week in which we will learn some menus of blur filter, which will help us create smoke effect. We will also cover up some brush technique too to make this smoke effect."

Video Tutorials
Photoshop Car Tuning – 65 videos and 3 how-to articles to learn all about Photoshop car tuning, by wonderhowto.com
YouTube – Tons of great video tutorials are hidden within YouTube. We attempt to pull out some of the best for you, sorted by view count.
вторник, 15 сентября 2009 г.
Pretty Pleased with the SWFAddress Apache, mod_rewrite, and PHP SEO Implementation
Pretty Pleased with the SWFAddress Apache, mod_rewrite, and PHP SEO Implementation: "
The latest project I've been working on at Rokkan has been umbro.com. When the project first came to us there was quite a bit of discussion over what technology to use, specifically HTML vs. Flash. The client, naturally, was concerned about SEO but also wanted a nice 'rich' experience. Sure, there's been a little bit of talk lately over the fact that Google can now index certain types of content with regards to SWF files and the files which they load, but its still sketchy at best. Not to mention you have to pay close attention to how you setup your text fields 'n such. Hell, when is the last time you searched on Google for something significant and got a result that takes you to a specific page of a Flash site/app? I honestly can't think of that every happening to me.
At any rate, after much debate we decided that the experience was a bit more important to us so we would focus on the Flash front end. Regardless of that decision, we also would create a text-only/HTML/SEO friendly version of the site for search engines to crawl using SWFAddress's SEO setup that uses a little special JavaScript, Apache's mod_rewrite and PHP. If you haven't checked this out yet, I highly recommend it.
If you're too lazy to go check out the SWFAddress site, I'll summarize what it does for you. Essentially, with the combination of the aforementioned technologies, SWFAddress now ships with a simple rule-based URL rewriting engine to handle entry URLs that do not contain the SWFAddress hash mark (#). This allows us to display equivalent content under the same folder structure that the Flash site/app uses for users that do not have both JavaScript and the Flash Player. For example, if you have JavaScript enabled and the Flash Player installed and go to www.umbro.com/en_UK/about/ you will be redirected to the SWFAddress/Flash friendly URL www.umbro.com/en_UK/#/about/. If you don't have JavaScript enabled or the Flash Player installed at all, mod_rewrite sends the folder path as a string to a PHP script. In this script you setup rules that determine what HTML content to display. Thus, you can display equivalent textual/semantic/SEO friendly content to anything that doesn't use JavaScript and Flash, eg: search engine spiders.
The only drawback I can see with this implementation at this point is the way in which users share URLs with each other. I'm guessing most users are more apt to simply copy and paste the URL from their browser's address bar than anything else. In this case they're grabbing the SWFAddress/Flash friendly URL with the hash (#) mark in it. Unfortunately if this is the URL that gets posted around the internet and shared via blogs, twitter, facebook, etc, then these pages aren't really going to increase in page rank all that much. However, in order to facilitate the sharing of the non-hash-marked URL, we've placed a 'Share This' tool on as many pages within the Flash app as possible. This button uses the link sharing API's for a few social networks and passes in the SEO friendly URLs (without the hash mark) instead of whats in the address bar.
One thing I will say if you do decide to use this approach is to be aware of the amount of extra work that it will entail. You're essentially creating two sites, one in HTML and one in Flash. This can become rather time consuming depending on the scope fo the project and the amount of content. In the case of umbro.com we didn't really have that many pages to duplicate but we did have four markets/languages. On top of this, we initially created very bare-bones and unstyled HTML content that we knew would get indexed as long as it was being spidered. However, once a few people checked out umbro.com on their mobile devices and noticed that the 'mobile' version was different than the version they saw on the desktops or laptops, those people suddenly thought that they were indeed seeing THE 'mobile' version, not the version that anyone or anything that doesn't have JavaScript and Flash will see. So suddenly we had to pretty up that content with some nice images and CSS styles which required a bit more work than we had anticipated from the start.
I'm pretty happy with how things turned out with umbro.com, if you do some obvious Google searches such as 'about umbro' or 'where to buy umbro' you can see that pages from umbro.com are appearing pretty high in the results right now and thats honestly good enough for me at this point as I've never built an entire site in Flash and had any sort of results show up in Google before. I'm also pretty curious as to who else out there has implemented this with good results, so if you or any other sites you know of that have gone with this solution please leave a comment and URL. Thanks in advance.
"понедельник, 7 сентября 2009 г.
Goldmine. How to set HTML format for outbound e-mail messages.
Ms Outlook can't correctly detect encoding of incoming e-mail message in text format. That's why we have to set html format of outgoing messages in Goldmine. In that case outlook displays message properly.
вторник, 1 сентября 2009 г.
Ms Windows. Как закрыть зависшее приложение?
Зависло приложение и не реагирует на попытки выйти из него? Не проблема. Достаточно вызвать Диспетчер задач и завершить соответствующий процесс.
понедельник, 31 августа 2009 г.
Windows. Set up NAT routing via console
Run [ services.msc ]. On the list find “Routing and Remote Access”, double click on it and set the Startup type to “Automatic” and click OK.
Now edit the following registry path:
My Computer > HKEY_LOCAL_MACHINE > SYSTEM > CurrentControlSet > Services > Tcpip > Parameters
Now in the list you will see something like “IPEnableRouter”.
Double click on it and turn the value from 0 to 1.
Now restart your computer.
You must know the names of your adapters you are using. For the tutorial we will use “Wireless Network Connection” for the public NIC and “Local Area Connection” for the private NIC.
Now we open the command prompt and type the following command to install NAT:
netsh routing ip nat install
Now type the next command to add the public interface:
netsh routing ip nat add interface "Wireless Network Connection" full
And the last command to add the private interface:
netsh routing ip nat add interface "Local Area Connection" private
Set an IP to the private NIC of the machine that is doing routing and the clients will use that IP as their default gateway. The client’s IP addresses must be the same subnet as the gateways. Your public NIC’s IP doesn’t need to be changed!
четверг, 27 августа 2009 г.
HFS Server. Add comments to uploaded files
To add in the upload page an additional comment besides each upload field so that you can enter a comment for each file uploaded, insert the following code to your HFS template:
%item-name%: {.!OK.} --- %item-size% ({.!Speed.} %speed% KB/s)
{.set|t|{.postvar|filecomment{.count|upload.}.}.}
{.if| %user% | {: {.set|t| by %user%. {.^t.} .} :} /if.}
{.if| {.^t.} |{: {.append| %folder-resource%\hfs.comments.txt |{.filename|%item-resource%.}={.convert|utf-8|ansi|{.^t.}.}
/append.} :}/if.}
Now you are able to add comments to files during the upload.
[special:begin]
{.comment| {.count|upload.} .}

[upload-file]
 comment

[upload-success]
{.set|t|{.postvar|filecomment{.count|upload.}.}.}
{.if| %user% | {: {.set|t| by %user%. {.^t.} .} :} /if.}
{.if| {.^t.} |{: {.append| %folder-resource%\hfs.comments.txt |{.filename|%item-resource%.}={.convert|utf-8|ansi|{.^t.}.}
/append.} :}/if.}
Now you are able to add comments to files during the upload.
Ultimate Guide To Web Optimization (Tips & Best Practices)
Ultimate Guide To Web Optimization (Tips & Best Practices): "
Web optimization is a vital part of web development and maintenance but also something often overlooked by webmasters. Just think of the money you can save, and how it can potentially help increase your readership and traffic when they are properly done.

If you have not done any optimization to your website (or blog) so far or merely curious how it can help speed up your site, please take a look at this list of optimization tips we’ve put together.
We’ve split things up into 3 separate sections for better readability – respectively server-side optimization, assets optimization (which includes web components like CSS, Javascript, images, etc) and platform, where we’ll focus on Wordpress optimization. At the last section, we throw in a couple of links we figured useful. Full list after jump.
From time to time, we monitor, benchmark and analyze the performance of our Wordpress blog. If the site is running slow, we need to know why. Here are some basic changes we’ve done and we figured will significantly increase the speed of your Wordpress blog.
Recommended Readings:
Recommended readings:
Here are more tips and tools worth checking out.
Web optimization is a vital part of web development and maintenance but also something often overlooked by webmasters. Just think of the money you can save, and how it can potentially help increase your readership and traffic when they are properly done.
If you have not done any optimization to your website (or blog) so far or merely curious how it can help speed up your site, please take a look at this list of optimization tips we’ve put together.
We’ve split things up into 3 separate sections for better readability – respectively server-side optimization, assets optimization (which includes web components like CSS, Javascript, images, etc) and platform, where we’ll focus on Wordpress optimization. At the last section, we throw in a couple of links we figured useful. Full list after jump.
Optimization: Server-side
Choose a decent Web Host
Your web hosting account has no direct relationship with the optimizations you are about to perform but we figured choosing the right web hosting account so important we decided to bring it to your attention first. Hosting account is the foundation of your website/blog where it’s security, accessibility (cPanel, FTP, SSH), server stability, prices and customer supports all play important roles. You need to make sure you are in good hands.
Recommended reading:
How to Choose a Web Host by wikiHow is a great article that gives you steps and tips you should know before purchasing any web hosting account.
Host Assets Separately
When we mention assets, we meant web components like images and static scripts that don’t require server-side processing. These includes any web graphics, images, Javascripts, Cascading Style Sheets (CSS), etc. Hosting assets separately is not a must, but we’ve seen tremendous result in terms of server stability with this implementation when the blog was having a traffic spike.
Recommended reading:
Maximizing Parallel Downloads in the Carpool Lane.
Compression with GZip
In short, contents travel from server side to client side (vicet versa) whenever a HTTP request is make. Compressing the content for sending greatly reduce the time needed to process each request.
GZip is one of the best ways to do this and it various according to the type of servers you are using. For instance, Apache 1.3 uses mod_zip, Apache 2.x uses mod_deflate and here’s how you do it in Nginx. Here are some really good articles to get you familiar with server side compressions:
- Speed up a web site by enabling Apache file compression
- Compress Web Output Using mod_gzip and Apache
- How To Optimize Your Site With GZIP Compression
- Server-side compression for ASP
Minimize Redirects
Webmasters do URL redirect (whether it’s Javascript or META redirects) all the time. Sometimes it’s purpose is to point users from an old page to new, or merely guide users to the correct page. Each redirect create an additional HTTP request and RTT (round-trip-time). The more redirection you have, the slower user will get to the destination page.
Recommended reading:
Avoid Redirects by Google Code gives you a good overview on the matter. The article also recommends some practical ways to minimize redirection to increase serving speed.
Reduce DNS Lookups
According to Yahoo! Developer Network Blog, it takes about 20-120 milliseconds for DNS (Domain Name System) to resolve IP address for a given hostname or domain name and the browser cannot do anything until the process is properly completed.
Author Steve Souders suggested that splitting these components across at least two but no more than four hostnames reduces DNS lookups and allow high degree parallel downloads. Read more on the article.
Optimization: The Assets (CSS, Javascripts, Images)
Merge Multiple Javascripts into One
Folks at rakaz.nl shares how you can combine multiple Javascripts like:
http://www.creatype.nl/javascript/prototype.js
http://www.creatype.nl/javascript/builder.js
http://www.creatype.nl/javascript/effects.js
http://www.creatype.nl/javascript/dragdrop.js
http://www.creatype.nl/javascript/slider.js
Into a single file by changing the URL to:
http://www.creatype.nl/javascript/prototype.js,builder.js,effects.js,dragdrop.js,slider.js
by manipulating the .htaccess and using PHP. Click here to read more.
Compress Javascript & CSS
Minify is a PHP5 app that can combine multiple CSS and Javascript files, compress their contents (i.e. removal of unnecessary whitespace/comments), and serve the results with HTTP encoding (gzip/deflate) and headers that allow optimal client-side caching.

Compress them online!

There are also some web services that allow you to manually compress your Javascripts and CSS files online. Here are few we come to know:
- compressor.ebiene (Javascript, CSS)
- javascriptcompressor.com (Javascript)
- jscompress.com (Javascript)
- CleanCSS (CSS)
- CSS Optimizer (CSS)
Customize Header Expiry/Caching

Credit: httpwatch
By using a customized Expiry header, your web components like images, static files, CSS, Javascript skipped unnecessary HTTP request when the same user reload the page for the second time. It reduces the bandwidth needed and definetely help in serving the page faster.
Recommended readings:
- Yahoo! Developer Network Blog – Add an Expires Header
- How To Add Good Expires Headers to Images in Apache 1.3
- HTTP Caching
- Caching Tutorial for Web Authors and Webmasters
Off-load The Assets
By off-loading, we mean separating the Javascripts, images, CSS and static files from main server where the website is hosted and place them on another server or rely on other web services. We’ve seen significant improvement here in Hongkiat by off-loading assets to other web services available, leaving the server to mainly do the PHP processing. Here are some suggestions of online services for off-loading:
- Images: Flickr, Smugmug, Paid hostings*
- Javascripts: Google Ajax Library, Google App Engine, Paid hostings*
- Web Forms: WuFoo, FormSpring
- RSS: Google Feedburner
- Survey and Polls: SurveyMonkey, PollDaddy
*Paid hostings – Paid services always have better reliability and stability. If your website is constantly requesting for the assets, you’ll need to make sure they are in good hands. We recommend Amazon S3 and Cloud Front.
Handling Web Images
Images are important part of your website. However if they are not properly optimize, they can become a burden and end up utilizing unpredictably large amount of bandwidths on daily basis. Here are some best practices to optimize your images:
- Optimize PNG Images
Folks at Smashing Magazine describes some clever techniques that may help you optimize your PNG-images. - Optimizing for Web – Things you need to know (the formats)
Learn more about Jpeg, GIF, PNG and how you should save your images for web. - Don’t Scale Images
Always practice inserting thewidthandheightfor each images. Also don’t scale down an image just because you need a smaller version on the web. For example: Do not force scale a 200×200 px image to 50×50 px for your website by altering thewidthandheight. Get a 50×50 px instead.
Optimizing with Web Services and Tools. Good news is, you don’t need to be a Photoshop expert to optimize your images. There are plenty of web services and tools to help you do the job.
- Smush.it

Probably one of the most efficient online tool to optimize images. There’s even a Wordpress plugin for it! - JPEG & PNG Stripper
A Windows tool for stripping/cleaning/removing unnecessary metadata (junk) from JPG/JPEG/JFIF & PNG files. - Online Image Optimizer
Lets you easily optimize your gifs, animated gifs, jpgs, and pngs, so they load as fast as possible on your site, by Dynamic Drive - SuperGIF
Effortlessly make all your GIF images and animations smaller. - Here’s more.
- Optimize PNG Images
Handling CSS
Modern websites uses CSS as the foundation of the style, as well as the look and feel. Not only CSS gives great flexibility to changes, it is also lesser in terms of codes needed. However, if they are badly coded, it could be a backfire. Here are some checklists, or rather guides to you make sure your CSS are properly optimized:
- Keeping Your Elements’ Kids in Line with Offspring
How to keep your markup clean with CSS Selectors. - Keep CSS short
When they give the same style, the codes are better the shorter they are. Here’s a CSS Shorthand guide you’ll probably need. - Use CSS Sprite

CSS Sprite technique reduce HTTP request each time a page is load by combining several (or all) images together on a single image file and control it’s output with CSSbackground-positionattribute. Here are some useful guides and techniques to create CSS Sprites:
- Creating easy and useful CSS Sprites
- Online CSS Sprite Generator
- Best Online And Offline CSS Sprites Generator
- Using every declaration just once
When looking to optimize your CSS files, one of the most powerful measures you can employ is to use every declaration just once. - Reduce amount of CSS files
The reason is simple, the more CSS files you have the more HTTP request it’ll have to make when a webpage is being requested. For example, instead of having multiple CSS files like the following:
<link rel="stylesheet" type="text/css" href="main.css" />
<link rel="stylesheet" type="text/css" href="body.css" />
<link rel="stylesheet" type="text/css" href="footer.css" />
You can combine them into the one single CSS:
<link rel="stylesheet" type="text/css" href="layout.css" />
Recommended readings:
- Useful Tools To Check, Clean & Optimize Your CSS File
Some of the useful tools that you can use to optimize your CSS code, even if you have completely no knowledge of CSS coding. - 7 Principles Of Clean And Optimized CSS Code
Optimization isn’t just minimizing file size – it’s also about being organized, clutter-free, and efficient. - Best Practices to optimize CSS
Consider this article more like an academic exercise rather than real-life optimization tips.
- Keeping Your Elements’ Kids in Line with Offspring
Optimization for Wordpress
From time to time, we monitor, benchmark and analyze the performance of our Wordpress blog. If the site is running slow, we need to know why. Here are some basic changes we’ve done and we figured will significantly increase the speed of your Wordpress blog.
Cache Your Worpress Blog
WP-Cache is an extremely efficient WordPress page caching system to make you site much faster and responsive. We also recommend WP Super Cache which enhances from the previous mentioned plugin and too does a great job.
Deactivate and Delete Unused Plugins
When you notice your blog is loading real slow, see if you have a lot of plugins installed. They might be the culprit.
Remove unnecessary PHP Tags
If you take a look into your theme’s source codes, you will find a lot tags like these:
<?php bloginfo('stylesheet_directory'); ?>
<?php bloginfo('description'); ?>
They can be pretty much replaced with text content that don’t cause load to the server. Check out Michael Martin’s 13 Tags to delete from your Wordpress Blog
Recommended Readings:
- 3 Easiest Ways to Speed Up WordPress
John Pozadzides shares how his blog sails smoothly through a Digg traffic spike. - 13 Great WordPress Speed Tips & Tricks for MAX Performance
Here are a few things to try if you find that your WordPress site is not performing as well as it could be due to high traffic or hidden issues you don’t know about. - 40 Wordpress Optimization Tips
Optimization tips in slides. 40 tips in 40 minutes.
Last but not least…
Here are some useful web services and tools that gives you a broader perspective and better analyzation to help you in web optimization.
Yahoo! YSlow
YSlow analyzes web pages and suggests ways to improve their performance based on a set of rules for high performance web pages. It gives you a good idea what needs to be done in order for the website to load faster.
(Firebug required)

PageSpeed
Similar to Yahoo! YSlow, Google Page Speed is an open-source Firebug add-on to evaluate the website performances and how to improve them. (Firebug required)

Pingdom Tools
Pingdom Tools take a complete load of your website including all objects (images, CSS, JavaScripts, RSS, Flash and frames/iframes) and shows you general statistics about the loaded page such as the total number of objects, total load time, and size including all objects.

Recommended readings:
Here are more tips and tools worth checking out.
вторник, 25 августа 2009 г.
Windows Vista Home Basic and Home Premium. Account password age
With Windows Vista Home Basic and Home premium an alternative command line option has to be selected in order to prevent the password from expiring.
To prevent the password from expiring in Vista Home Basic and Home premium in the Command Prompt window, execute command:
The Maximum Password Age will now be set to Zero and your password will no longer expire.
To prevent the password from expiring in Vista Home Basic and Home premium in the Command Prompt window, execute command:
net accounts /maxpwage:unlimited
The Maximum Password Age will now be set to Zero and your password will no longer expire.
понедельник, 24 августа 2009 г.
Flash. ReferenceError: Error #1056: Caused by Declaring Stage Instances Private
To avoid this error simply declare my_mc as public:
public var my_mc:MovieClip;
public var my_mc:MovieClip;
MS RDP. Because of a protocol error, this session will be disconnected. Please try connecting to the remote computer again
Problem:
i had remote desktop up and running on a PC and then i got this:
"because of a protocol error detected at the client (code 0x1104), this session will be disconnected.
please try connecting to the remote computer again"
Solution:
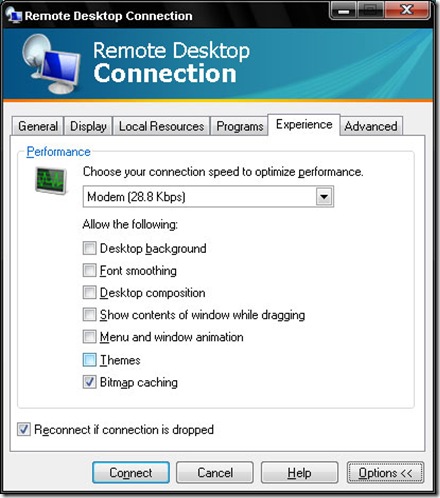
The most common reason why this is happening is because you are using a custom VISUAL STYLE with your computer. Set the visual style back to LUNA on XP or CLASSIC and see if the error occurs again. Most likely it will not. Not all visual styles produce this error, but if you want a custom visual style on the remote computer then you will have to find a compatible visual style that works with RDP via trial and error.
Another solution would be to set the RDP client to NOT use the visual styles by unchecking the box that says THEMES (see pic below):
i had remote desktop up and running on a PC and then i got this:
"because of a protocol error detected at the client (code 0x1104), this session will be disconnected.
please try connecting to the remote computer again"
Solution:
The most common reason why this is happening is because you are using a custom VISUAL STYLE with your computer. Set the visual style back to LUNA on XP or CLASSIC and see if the error occurs again. Most likely it will not. Not all visual styles produce this error, but if you want a custom visual style on the remote computer then you will have to find a compatible visual style that works with RDP via trial and error.
Another solution would be to set the RDP client to NOT use the visual styles by unchecking the box that says THEMES (see pic below):

Подписаться на:
Сообщения (Atom)